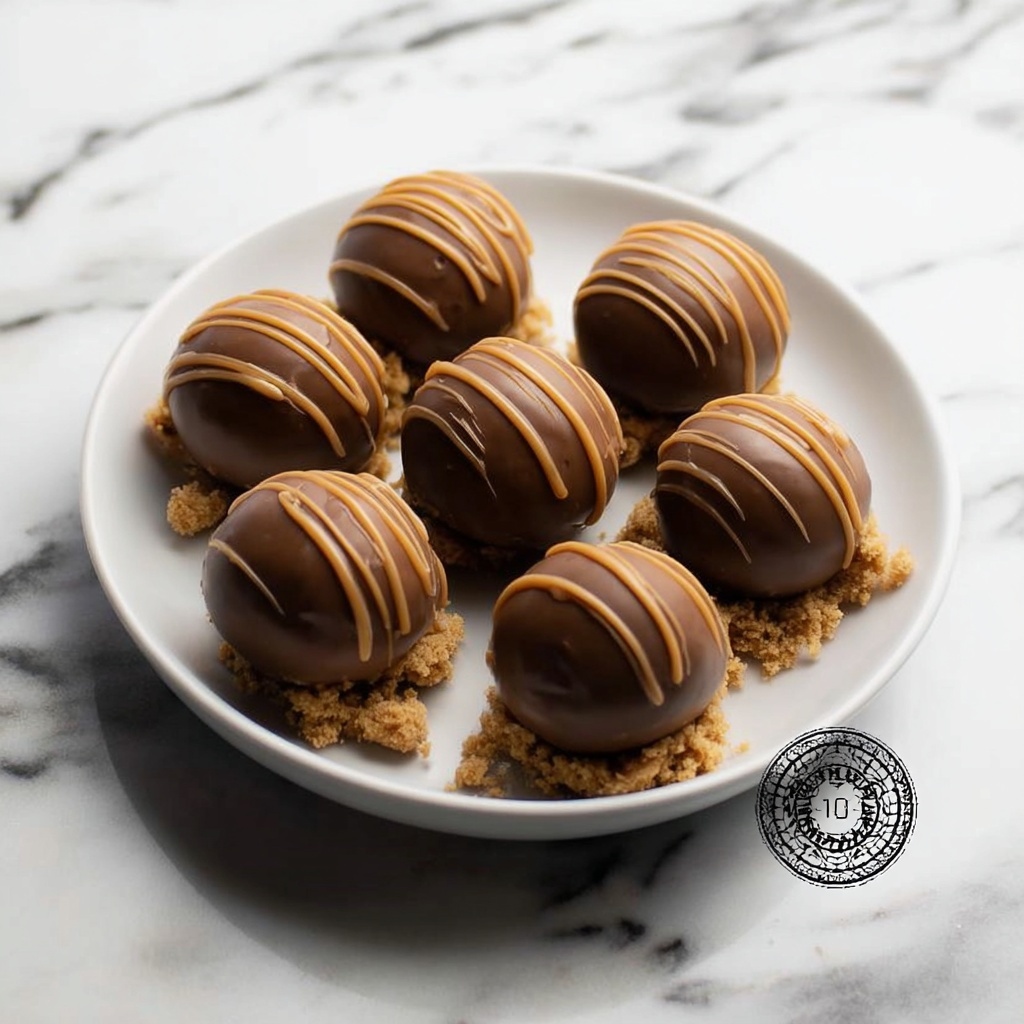
If you have a sweet tooth and a love for rich, buttery treats, you are absolutely going to adore this Brown Sugar Toffee Truffles Recipe. These little bites of joy combine the deep caramel notes of brown sugar with crunchy toffee bits, all wrapped in a silky smooth caramel coating. They are surprisingly simple to make yet deliver a luxurious texture and flavor that feels like a special indulgence. Whether you’re treating yourself or sharing with friends, these truffles are a crowd-pleaser that melts in your mouth and leaves you craving just one more.
Ingredients You’ll Need
Every incredible Brown Sugar Toffee Truffles Recipe starts with a handful of humble ingredients that bring distinct flavors and textures to the table. Each one plays its own role, ensuring the truffles are perfectly sweet, creamy, and satisfyingly crunchy.
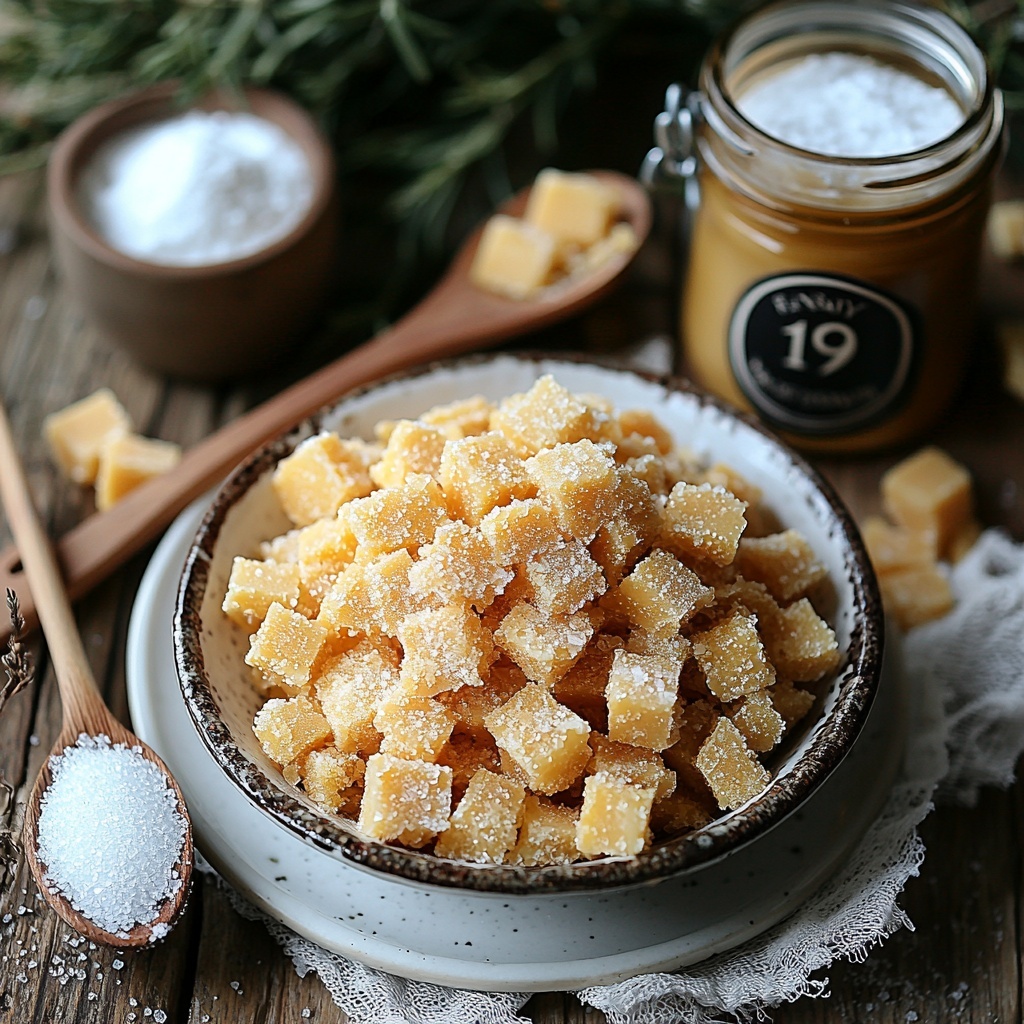
- Brown sugar: Brings a deep molasses flavor that’s richer than regular sugar.
- Unsalted butter (softened): Adds creaminess and helps create that smooth truffle texture.
- Powdered sugar: Essential for sweetness and gives the truffle dough its soft yet firm consistency.
- Vanilla extract: A splash of warmth and complexity that enhances every bite.
- Toffee bits: Provide a delightful crunch and burst of buttery caramel flavor.
- Caramel melting wafers or butterscotch chips: The luscious coating that envelops each truffle in a shiny, smooth shell.
- Sea salt (optional): A sprinkle of this brightens the sweetness and contrasts beautifully with the caramel.
How to Make Brown Sugar Toffee Truffles Recipe
Step 1: Cream the Butter and Brown Sugar
Start by taking your softened butter and brown sugar, then beating them together in a large mixing bowl until the mixture is light, fluffy, and beautifully blended. This step is crucial because you want your truffles to have that signature velvety texture and rich flavor foundation.
Step 2: Add in the Vanilla Extract
Once your butter and sugar base is ready, stir in the vanilla extract. This little addition lifts the overall flavor, adding a warm and inviting note that makes every bite feel homemade and comforting.
Step 3: Incorporate the Powdered Sugar
Gradually mix in the powdered sugar, making sure to blend after each addition. This not only sweetens the dough but also thickens it until it’s firm enough to handle comfortably without sticking to your fingers.
Step 4: Fold in Toffee Bits
Gently fold in the crunchy toffee bits, ensuring they’re evenly distributed throughout the mixture. These bits create that wonderful crunchy surprise you’ll love when you bite into the soft, chewy center.
Step 5: Shape the Truffles
Take the dough and roll it into tablespoon-sized balls, placing each one onto a parchment-lined tray. This part can be a fun and satisfying hands-on step as you see the truffles coming to life!
Step 6: Chill Until Firm
Pop the tray into the refrigerator and let the truffles chill for 30 to 45 minutes. This helps the truffles set up nicely, making them easier to dip in the melted coating in the next steps.
Step 7: Melt the Caramel or Butterscotch Chips
In a microwave-safe bowl, carefully melt your choice of caramel melting wafers or butterscotch chips. Stir every 30 seconds to ensure a smooth, silky coating without any lumps.
Step 8: Dip the Chilled Truffles
One by one, dip each chilled truffle into the melted coating, allowing any excess to drip back into the bowl. This process gives each truffle that irresistible glossy shell that hardens to a perfect finish.
Step 9: Place Back on Parchment
Lay the coated truffles back onto the parchment-lined tray, getting them ready for the finishing touches before the coating sets. This is where your truffles start looking truly tempting!
Step 10: Optional Sea Salt Sprinkle
While the coating is still wet, sprinkle a pinch of sea salt over each truffle. This optional step creates an exciting balance of flavors and a subtle crunch that accentuates the sweetness.
Step 11: Let Coating Set Completely
Allow the coating to set fully at room temperature or place them briefly in the fridge to speed up the process. Once set, your truffles are ready for the best part — tasting!
Step 12: Store Properly
Store your finished truffles in an airtight container in the fridge. They’ll stay fresh and delicious for up to two weeks, perfect for sweet cravings or gifting.
How to Serve Brown Sugar Toffee Truffles Recipe
Garnishes
While the sea salt sprinkle is classic, you can also add a dusting of cocoa powder, a drizzle of dark chocolate, or even a few crushed nuts on top for extra texture and visual appeal. These garnishes can turn simple truffles into elegant treats that impress at any gathering.
Side Dishes
Brown Sugar Toffee Truffles pair wonderfully with a steaming cup of coffee, chai tea, or a glass of dessert wine. Their sweetness complements these drinks perfectly, making for a delightful afternoon pick-me-up or dessert.
Creative Ways to Present
Arrange the truffles in decorative gift boxes lined with festive paper if you’re sharing. For parties, place them on a beautiful platter with a few fresh flowers or edible gold leaf to elevate the experience and make it feel special and decadent.
Make Ahead and Storage
Storing Leftovers
If you have any truffles left over (though that might be hard!), be sure to store them in an airtight container in the refrigerator. This keeps them fresh, prevents the coating from melting, and preserves the crunchy toffee bits perfectly.
Freezing
You can freeze Brown Sugar Toffee Truffles Recipe treats too. Place them in a single layer on a tray to freeze first, then transfer to a freezer-safe container. When you want to indulge, thaw them overnight in the fridge. This way, your truffles retain their texture and flavor.
Reheating
These truffles are best enjoyed chilled, so reheating isn’t generally necessary. If they’ve softened too much, simply refrigerate them for a bit before serving to bring back that perfect firmness and snap in the coating.
FAQs
Can I use white sugar instead of brown sugar?
This recipe relies on brown sugar for its signature caramel-like depth, so substituting with white sugar will change the flavor significantly. For best results, stick to brown sugar.
What type of toffee bits work best?
Regular store-bought toffee bits are perfect here. Look for ones with buttery, crunchy texture to add that delightful contrast inside the truffle.
Can these truffles be made dairy-free?
You can attempt a dairy-free version by using vegan butter and ensuring your caramel wafers or chips are dairy-free. Keep in mind the texture and flavor might slightly differ.
How long do Brown Sugar Toffee Truffles last?
Stored properly in an airtight container in the fridge, these truffles stay fresh for up to two weeks, making them great for preparing ahead of time.
Is it necessary to chill the truffles before dipping?
Yes, chilling the truffle dough firms it up, making it much easier to dip into the melted coating without them falling apart or melting.
Final Thoughts
I can’t recommend making this Brown Sugar Toffee Truffles Recipe enough if you love treating yourself or gifting something truly special. The blend of buttery sweetness and toffee crunch wrapped in smooth caramel is just unbeatable. Give it a try, and trust me, these truffles will quickly become one of your favorite homemade sweets to enjoy anytime!
Print
Brown Sugar Toffee Truffles Recipe
- Prep Time: 20 minutes
- Cook Time: 0 minutes
- Total Time: 1 hour (including chilling and setting time)
- Yield: 24 truffles
- Category: Dessert
- Method: No-Cook
- Cuisine: American
- Diet: Vegetarian
Description
Deliciously rich Brown Sugar Toffee Truffles combine the buttery sweetness of brown sugar and toffee bits with a smooth caramel coating. These bite-sized treats are easy to make, requiring no baking, and are perfect for gifting or enjoying as a sweet indulgence.
Ingredients
Truffle Base
- 1 cup brown sugar
- ½ cup unsalted butter (softened)
- 1 ½ cups powdered sugar
- 1 teaspoon vanilla extract
- ½ cup toffee bits
Coating
- 12 ounces caramel melting wafers or butterscotch chips
- Sea salt (optional, for garnish)
Instructions
- Cream Butter and Brown Sugar: In a large mixing bowl, cream together the softened butter and brown sugar until the mixture is light and fluffy, creating a smooth base for the truffles.
- Add Vanilla: Mix in the vanilla extract thoroughly to infuse the flavor evenly throughout the mixture.
- Add Powdered Sugar: Gradually incorporate the powdered sugar, mixing well after each addition until the dough becomes thick and pliable enough to handle.
- Fold in Toffee Bits: Gently fold the toffee bits into the dough so they are evenly distributed, adding texture and bursts of sweetness.
- Roll into Balls: Using a tablespoon measure, roll the mixture into balls and place them on a parchment-lined tray, prepping them for chilling.
- Chill Truffle Base: Refrigerate the shaped truffle balls for 30 to 45 minutes until firm, which makes them easier to dip in the coating.
- Melt Coating: Place the caramel melting wafers or butterscotch chips in a microwave-safe bowl and melt them by heating for 30-second intervals, stirring between each until smooth and glossy.
- Dip Truffles: One by one, dip the chilled truffle balls into the melted coating, allowing any excess to drip off to avoid clumpy layers.
- Place Coated Truffles: Transfer the dipped truffles back onto the parchment-lined tray for setting.
- Optional Salt Garnish: While the coating is still wet, sprinkle a pinch of sea salt on top of each truffle to enhance the flavor balance.
- Set Coating: Allow the coating to set completely at room temperature, or place the truffles briefly in the refrigerator to speed up the setting process.
- Store: Store finished truffles in an airtight container in the refrigerator for up to 2 weeks to keep them fresh and flavorful.
Notes
- Use softened unsalted butter for best creaming results.
- Ensure the truffle base is chilled well before dipping to prevent melting of the coating.
- Substitute caramel melting wafers with good quality butterscotch chips if preferred.
- Sea salt topping is optional but adds a nice sweet-savory contrast.
- Keep truffles refrigerated in an airtight container to maintain freshness and texture.


