
If you are on the hunt for a dessert that bursts with color, texture, and fun, look no further than Fruity Pebbles Cheesecake Tacos: A Fun and Colorful Dessert Recipe. This delightful treat transforms your favorite nostalgic cereal into crisp taco shells filled with a luscious, creamy cheesecake that’s as vibrant and playful as it is delicious. Whether you’re surprising friends at a casual get-together or just craving a whimsical sweet bite, these cheesecake tacos captivate both the eye and the palate in the most joyous way possible.
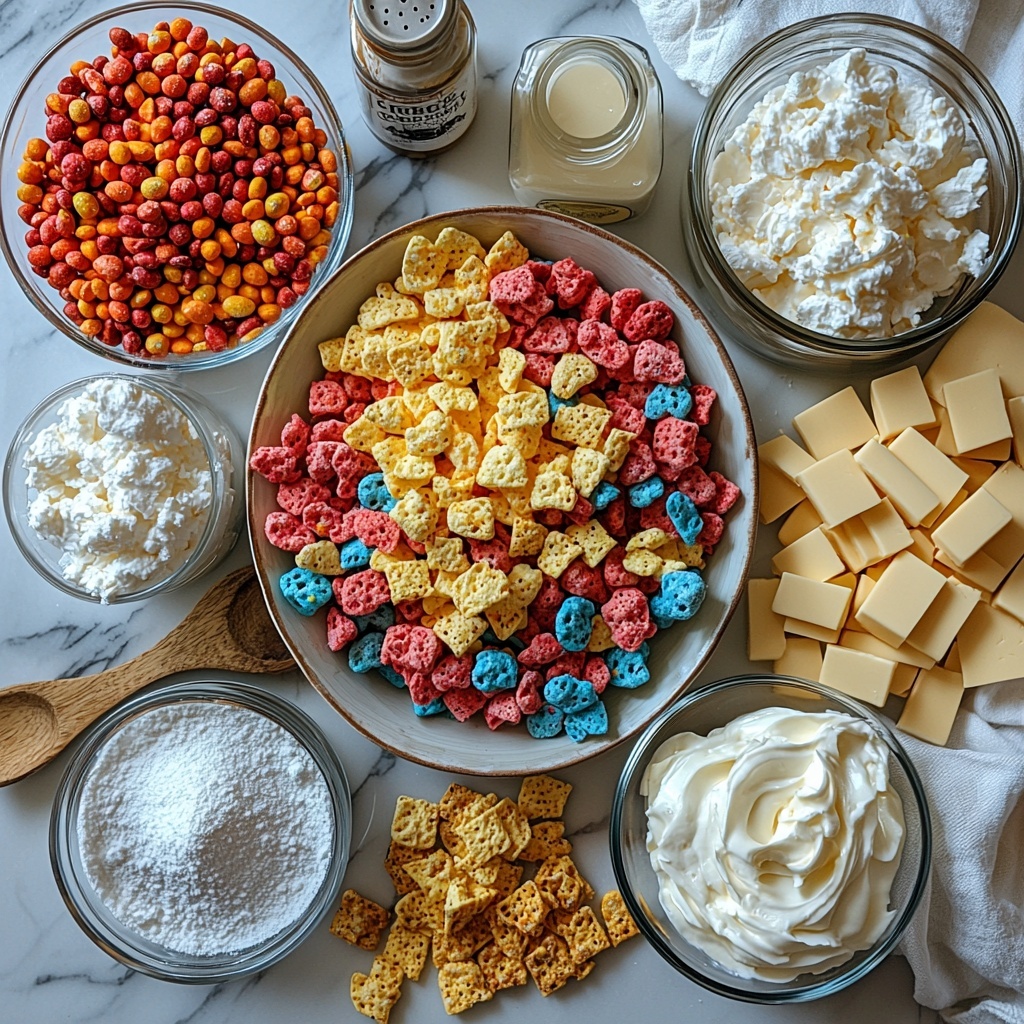
Ingredients You’ll Need
Gathering these ingredients is a breeze, yet each one plays a crucial role in building the flavor and charm of your Fruity Pebbles Cheesecake Tacos: A Fun and Colorful Dessert Recipe. The combination of crunchy cereal, smooth cream cheese, and dreamy whipped cream comes together to create layers of taste and texture that are simply irresistible.
- 3 cups fruity cereal: Choose your favorite brand; this forms the colorful, crunchy taco shells and adds nostalgic flavor.
- 1/2 cup unsalted butter (melted): Helps bind the cereal into sturdy shells with a touch of richness.
- 8 oz cream cheese (softened): The creamy base for the cheesecake filling; ensure it’s at room temperature for smoothness.
- 1/2 cup powdered sugar (sifted): Adds sweetness while keeping the cheesecake filling silky without any graininess.
- 1 tsp pure vanilla extract: Infuses the filling with warm, comforting aromatic notes.
- 1 cup whipped cream (freshly whipped): Lightens the cheesecake mixture, giving it delightful fluffiness.
- Additional fruity cereal (for garnish): Sprinkles on top add a final crunchy, colorful flourish.
How to Make Fruity Pebbles Cheesecake Tacos: A Fun and Colorful Dessert Recipe
Step 1: Create the Crunchy Cereal Shells
Mix the 3 cups of fruity cereal with the melted butter in a bowl. Every piece should be coated evenly so that once shaped, the taco shells hold together with a satisfying crunch and vibrant look. This is the foundation of your fun dessert, providing that unmistakable Fruity Pebbles texture and color.
Step 2: Shape and Chill the Shells
Press the cereal mixture firmly into taco-shaped molds or muffin tins, making sure to compact it well so the shells won’t fall apart later. Pop them into the fridge for at least 30 minutes. Chilling lets them set perfectly firm, so when you remove and fill them, they keep their fun, taco form.
Step 3: Whip Up the Cheesecake Filling
Using a hand mixer, beat the softened cream cheese until it’s light and fluffy—that’s the secret for a smooth, creamy filling. Then gradually blend in the sifted powdered sugar and vanilla extract until the mixture becomes silky and rich, ready to balance that crisp shell with creamy sweetness.
Step 4: Fold in the Whipped Cream
Carefully fold the freshly whipped cream into the cream cheese mixture with a spatula. This step is crucial: gently mixing keeps the filling airy and light, making every bite feel like a little cloud of cheesecake magic inside those crunchy cereal tacos.
Step 5: Fill the Shells
Once your cereal shells are chilled and firm, spoon generous portions of the cheesecake filling into each taco shell. The contrast of textures is irresistibly playful—from crumbly, colorful shell to the smooth, fluffy filling that melts in your mouth.
Step 6: Garnish and Enjoy
Just before serving, sprinkle extra Fruity Pebbles cereal on top for an extra pop of color and a delightful crunch. This final touch not only makes the tacos look festive but adds an extra dimension of texture that elevates the presentation and the taste experience.
How to Serve Fruity Pebbles Cheesecake Tacos: A Fun and Colorful Dessert Recipe
Garnishes
Elevate your Fruity Pebbles Cheesecake Tacos: A Fun and Colorful Dessert Recipe with bright garnishes like fresh berries, edible flowers, or a drizzle of colorful fruit sauce. Garnishes add visual appeal and layer in burst-after-burst of fresh flavor alongside the creamy, crunchy base.
Side Dishes
Keep the party vibes going by pairing these dessert tacos with light, complementary sides such as citrus fruit salad or a scoop of refreshing sorbet. These fresh options cleanse the palate and accentuate the sweetness without overwhelming it.
Creative Ways to Present
For an unforgettable presentation, serve these cheesecake tacos standing upright in a taco holder or nestled in a bed of ice cream cones filled with extra Fruity Pebbles. Surprise guests by serving mini versions at a colorful dessert bar, letting everyone customize with their favorite toppings. Presentation is half the fun with this vibrant recipe!
Make Ahead and Storage
Storing Leftovers
If you happen to have leftovers, keep your Fruity Pebbles Cheesecake Tacos in an airtight container in the refrigerator for up to 2 days. The cereal shells may soften slightly over time but will still taste delicious and maintain much of their crunch.
Freezing
While technically possible to freeze the filled tacos, it’s best to freeze the cereal shells separately to maintain their crispness. Freeze shells in a sealed bag for up to a month, then thaw and fill just before serving to keep that fun texture intact.
Reheating
Since this is a no-bake dessert, reheating isn’t necessary and could spoil the texture of the cereal shells and filling. Serve chilled or at cool room temperature for the best experience.
FAQs
Can I use other cereals besides Fruity Pebbles?
Absolutely! While Fruity Pebbles give a vibrant color and a particular crunch, you can experiment with other colorful cereals like Cocoa Pebbles or Trix to switch up the flavor and look without losing the fun factor.
Do the cereal shells get soggy over time?
They can soften slightly if stored for more than a day because of the moisture from the filling. That’s why it’s best to assemble the tacos close to serving time or store cereal shells and filling separately when possible.
Is this recipe gluten-free?
Check the packaging of your chosen cereal, as some Fruity Pebbles varieties are gluten-free, but others may not be. Using certified gluten-free cereal ensures the recipe works for gluten-sensitive guests.
Can I make the cheesecake filling dairy-free?
You can try swapping regular cream cheese and whipped cream with dairy-free alternatives, like plant-based cream cheese and coconut whipped cream, but keep in mind that texture and flavor might vary slightly.
How long does it take to prepare this dessert?
The active preparation takes about 20 minutes, plus at least 30 minutes chilling time for the shells. It’s a quick and joyful recipe perfect for last-minute celebrations or easy dessert surprises.
Final Thoughts
I sincerely hope you give Fruity Pebbles Cheesecake Tacos: A Fun and Colorful Dessert Recipe a try. It’s one of those delightful treats that brings joy with every bite, perfect for turning any ordinary day into a mini celebration. Whip it up, share it with loved ones, and watch those smiles light up the room with pure colorful cheer!
Print
Fruity Pebbles Cheesecake Tacos: A Fun and Colorful Dessert Recipe
- Prep Time: 20 minutes
- Cook Time: 0 minutes
- Total Time: 50 minutes
- Yield: 6 tacos
- Category: Dessert
- Method: No-Cook
- Cuisine: American
Description
Delicious Fruity Pebbles Cheesecake Tacos combine colorful cereal shells with a creamy, fluffy cheesecake filling for a fun and unique dessert that’s perfect for parties or a playful treat.
Ingredients
Cereal Shells
- 3 cups fruity cereal (any brand)
- 1/2 cup unsalted butter (melted)
Cheesecake Filling
- 8 oz cream cheese (softened to room temperature)
- 1/2 cup powdered sugar (sifted)
- 1 tsp pure vanilla extract
- 1 cup whipped cream (freshly whipped)
Garnish
- Additional fruity cereal (for garnish)
Instructions
- Prepare the Cereal Mixture: In a mixing bowl, stir together 3 cups of fruity cereal and 1/2 cup melted butter until each piece is evenly coated. The mixture should feel sticky and colorful!
- Form the Taco Shells: Press the cereal mixture firmly into taco-shaped molds or muffin tins. Make sure to compact it well, then chill in the refrigerator for at least 30 minutes until the shells are set.
- Make the Cheesecake Filling: Beat 8 oz softened cream cheese with a hand mixer until light and fluffy. Gradually blend in 1/2 cup sifted powdered sugar and 1 tsp vanilla extract until the mixture is smooth and creamy.
- Fold in Whipped Cream: Gently fold 1 cup of whipped cream into the cream cheese mixture using a spatula. Be careful not to overmix; you want it to stay light and airy!
- Fill the Taco Shells: Once the cereal shells are firm, generously spoon the cheesecake filling into each shell. Let every bite be a surprise of creamy sweetness!
- Garnish and Serve: Sprinkle additional fruity cereal over the filled shells for a burst of color and crunch just before serving. It enhances both the look and texture!
Notes
- Make sure the cream cheese is at room temperature to ensure a smooth and creamy filling.
- Press the cereal mixture firmly into the molds for sturdy taco shells that hold their shape.
- Refrigerate the filled tacos for an additional 15 minutes before serving for best texture.
- You can substitute whipped cream with stabilized whipped cream to maintain filling consistency longer.
- Use any fruity cereal you prefer or mix different brands for a more colorful shell.


