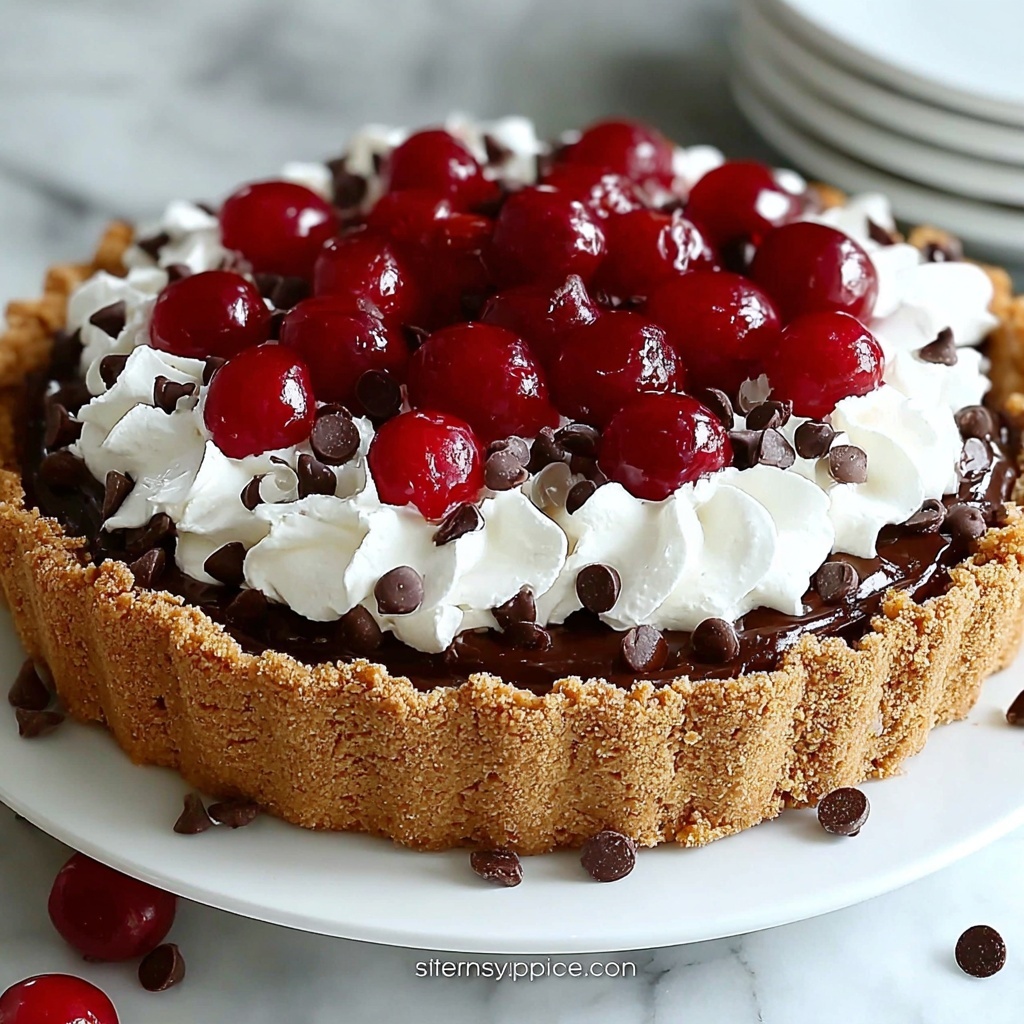
If you are craving a dessert that is both effortless and irresistibly delicious, this No-Bake Easy Cherry Chocolate Chip Pie Recipe is exactly what you need. The combination of tangy cherry pie filling, sweet chocolate chips, and a silky whipped topping resting on a buttery graham cracker crust makes this pie a showstopper without any oven time. Perfect for warm days, last-minute gatherings, or whenever you want a slice of joy with minimal fuss, this pie brings together classic flavors in the most delightful no-bake way.

Ingredients You’ll Need
This recipe shines because it relies on simple ingredients that each play a critical role in flavor and texture. From the buttery crunch of the graham cracker crust to the luscious whipped topping, every component is straightforward yet special. Here’s what you’ll gather to get started:
- Graham cracker crumbs (2 cups): The base that creates a crisp, slightly sweet crust that holds everything beautifully.
- Melted butter (1/2 cup): Binds the crust together while adding rich flavor and a tender bite.
- Granulated sugar (1/4 cup): Enhances sweetness and balances the tartness of the cherries perfectly.
- Cherry pie filling (1 can, 21 oz): Provides the vibrant, juicy cherry layer packed with flavor and color.
- Chocolate chips (1 cup): Adds pockets of melted chocolate magic that perfectly complement the cherry’s tartness.
- Whipped topping (1 tub, 8 oz): Creates a creamy, airy finish that’s luscious and light on the palate.
- Optional garnishes: Extra chocolate chips and cherries to make your pie pop visually and tastewise.
How to Make No-Bake Easy Cherry Chocolate Chip Pie Recipe
Step 1: Prepare the Crust
Start by combining graham cracker crumbs, melted butter, and granulated sugar in a medium bowl. Mix until everything is moist and evenly combined. Then firmly press this mixture into the bottom and up the sides of a 9-inch pie pan to form a sturdy crust. A good press ensures that your crust holds together when serving. Pop it into the fridge to chill for 30 minutes so it sets perfectly.
Step 2: Add the Cherry Filling
Once the crust has chilled, spread the luscious cherry pie filling evenly across the surface. Using a spatula, smooth it out gently to create a consistent layer. The bright, glossy cherries offer that classic pie experience and serve as the perfect contrast to the crunchy crust underneath.
Step 3: Sprinkle Chocolate Chips
Next, scatter 1 cup of chocolate chips evenly over the cherry filling. These little morsels will melt slightly against the warm pie filling, adding rich bursts of chocolate that make every bite a delight. They bring an indulgent twist to the fruit pie base.
Step 4: Top with Whipped Cream
Generously spread or pipe the whipped topping over the chocolate chip layer. This cool, fluffy layer lightens the pie’s texture and balances sweetness beautifully. You can create decorative swirls here to elevate the pie’s presentation and make it look irresistible.
Step 5: Garnish and Chill
For the final touch, sprinkle extra chocolate chips and a few cherries on top to dazzle your guests and add texture. Refrigerate the entire pie for at least 2 hours before serving. This chilling time allows the flavors to meld and ensures the pie slices cleanly.
How to Serve No-Bake Easy Cherry Chocolate Chip Pie Recipe
Garnishes
To make your pie look as gorgeous as it tastes, adorn it with vibrant fresh cherries or maraschino cherries along with some dark or milk chocolate chips. You can even add a sprinkle of finely chopped nuts or a light dusting of cocoa powder for an extra special touch.
Side Dishes
This pie pairs wonderfully with a scoop of vanilla bean ice cream or a drizzle of homemade chocolate or caramel sauce for an extra indulgent experience. Fresh fruit salad or simply a cup of coffee or tea complements the sweetness perfectly and balances the richness.
Creative Ways to Present
Consider serving individual slices with a dollop of whipped cream and a cherry on top for a charming presentation. You can also transform the pie into mini parfaits layered in glasses with more whipped cream and chocolate chips, making it fun and portion-friendly for parties.
Make Ahead and Storage
Storing Leftovers
Store leftover pie covered tightly with plastic wrap or in an airtight container in the refrigerator. It will stay fresh and delicious for up to 3 days, making it easy to enjoy without any loss of flavor or texture.
Freezing
This pie is best enjoyed fresh or refrigerated, as freezing can change the texture of the whipped topping and the crust. If you want to freeze, wrap the pie tightly in plastic wrap and aluminum foil, and thaw in the fridge overnight before serving. Note that the texture might be slightly softer after freezing.
Reheating
Since this is a no-bake frozen-style pie, reheating is not recommended. Serve chilled for the best texture and flavor experience.
FAQs
Can I use fresh cherries instead of canned pie filling?
Absolutely! Fresh cherries can be cooked down slightly with sugar and a bit of lemon juice to mimic pie filling. However, canned pie filling is convenient and already has the perfect consistency for this pie.
Is there a way to make this pie gluten-free?
Yes! Substitute the graham cracker crumbs with a gluten-free version or crushed gluten-free cookies to keep that lovely crust while accommodating dietary needs.
Can I make this pie vegan?
To veganize this recipe, use dairy-free butter, vegan whipped topping alternatives, and ensure your chocolate chips are dairy-free. It’s an easy swap that keeps the flavor intact.
How long does the pie need to chill?
At least 2 hours is ideal to let everything set firmly and the flavors meld beautifully. If you can chill it longer, that’s even better for texture.
Can I double the recipe for a larger crowd?
Definitely! Just double the ingredients and prepare two pies or use a larger pan. The steps remain the same and it’s a fantastic option for parties or family gatherings.
Final Thoughts
I can’t recommend this No-Bake Easy Cherry Chocolate Chip Pie Recipe enough for anyone who loves fuss-free desserts bursting with classic flavors. It’s perfect for warm weather or any time you want a quick yet impressive treat. Give it a try—you’ll be amazed how simple ingredients come together to create something truly special that everyone will ask for again and again!
Print
No-Bake Easy Cherry Chocolate Chip Pie Recipe
- Prep Time: 20 minutes
- Cook Time: 0 minutes
- Total Time: 2 hours 20 minutes
- Yield: 8 servings
- Category: Dessert
- Method: No-Cook
- Cuisine: American
Description
This no-bake easy cherry chocolate chip pie is a delightful and simple dessert that combines a crunchy graham cracker crust with a sweet cherry filling, melty chocolate chips, and fluffy whipped topping. Perfect for a quick dessert that requires no oven time, it’s chilled to set and garnished for a beautiful presentation.
Ingredients
Crust
- 2 cups graham cracker crumbs
- 1/2 cup melted butter
- 1/4 cup granulated sugar
Filling and Topping
- 1 can (21 oz) cherry pie filling
- 1 cup chocolate chips
- 1 tub (8 oz) whipped topping
- Optional: additional chocolate chips and cherries for garnish
Instructions
- Prepare the Crust: In a medium bowl, mix the graham cracker crumbs, melted butter, and granulated sugar thoroughly until combined. Press the crumb mixture firmly into the bottom and up the sides of a 9-inch pie pan to form an even crust. Place the crust in the refrigerator to chill and set for 30 minutes.
- Add the Cherry Filling: Remove the chilled crust from the fridge. Evenly spread the 21-ounce can of cherry pie filling over the crust, smoothing the surface gently with a spatula to create an even layer.
- Sprinkle Chocolate Chips: Evenly distribute 1 cup of chocolate chips over the cherry filling layer, ensuring coverage across the surface for bursts of chocolate flavor.
- Top with Whipped Cream: Spoon or pipe the 8-ounce whipped topping generously on top of the chocolate chip layer. Use a spatula or piping bag to create decorative swirls for an attractive finish.
- Garnish and Chill: Optionally, sprinkle additional chocolate chips and cherries on top for extra decoration. Refrigerate the fully assembled pie for at least 2 hours to allow it to set and flavors to meld before serving.
Notes
- This pie is best served chilled and can be stored in the refrigerator for up to 3 days.
- Use full-fat whipped topping for a richer texture, or a lighter variety for fewer calories.
- You can substitute cherry pie filling with other fruit pie fillings for variation.
- Press the crust firmly to prevent it from crumbling when slicing.
- For extra crunch, add chopped nuts into the crust mixture if desired.

